'기초부터 다지는 ElasticSearch 운영 노하우' 책을 읽고 정리한 내용입니다.
inverted index
엘라스틱서치의 검색엔진을 활용하면 검색이 빠른 이유는 무엇일까?
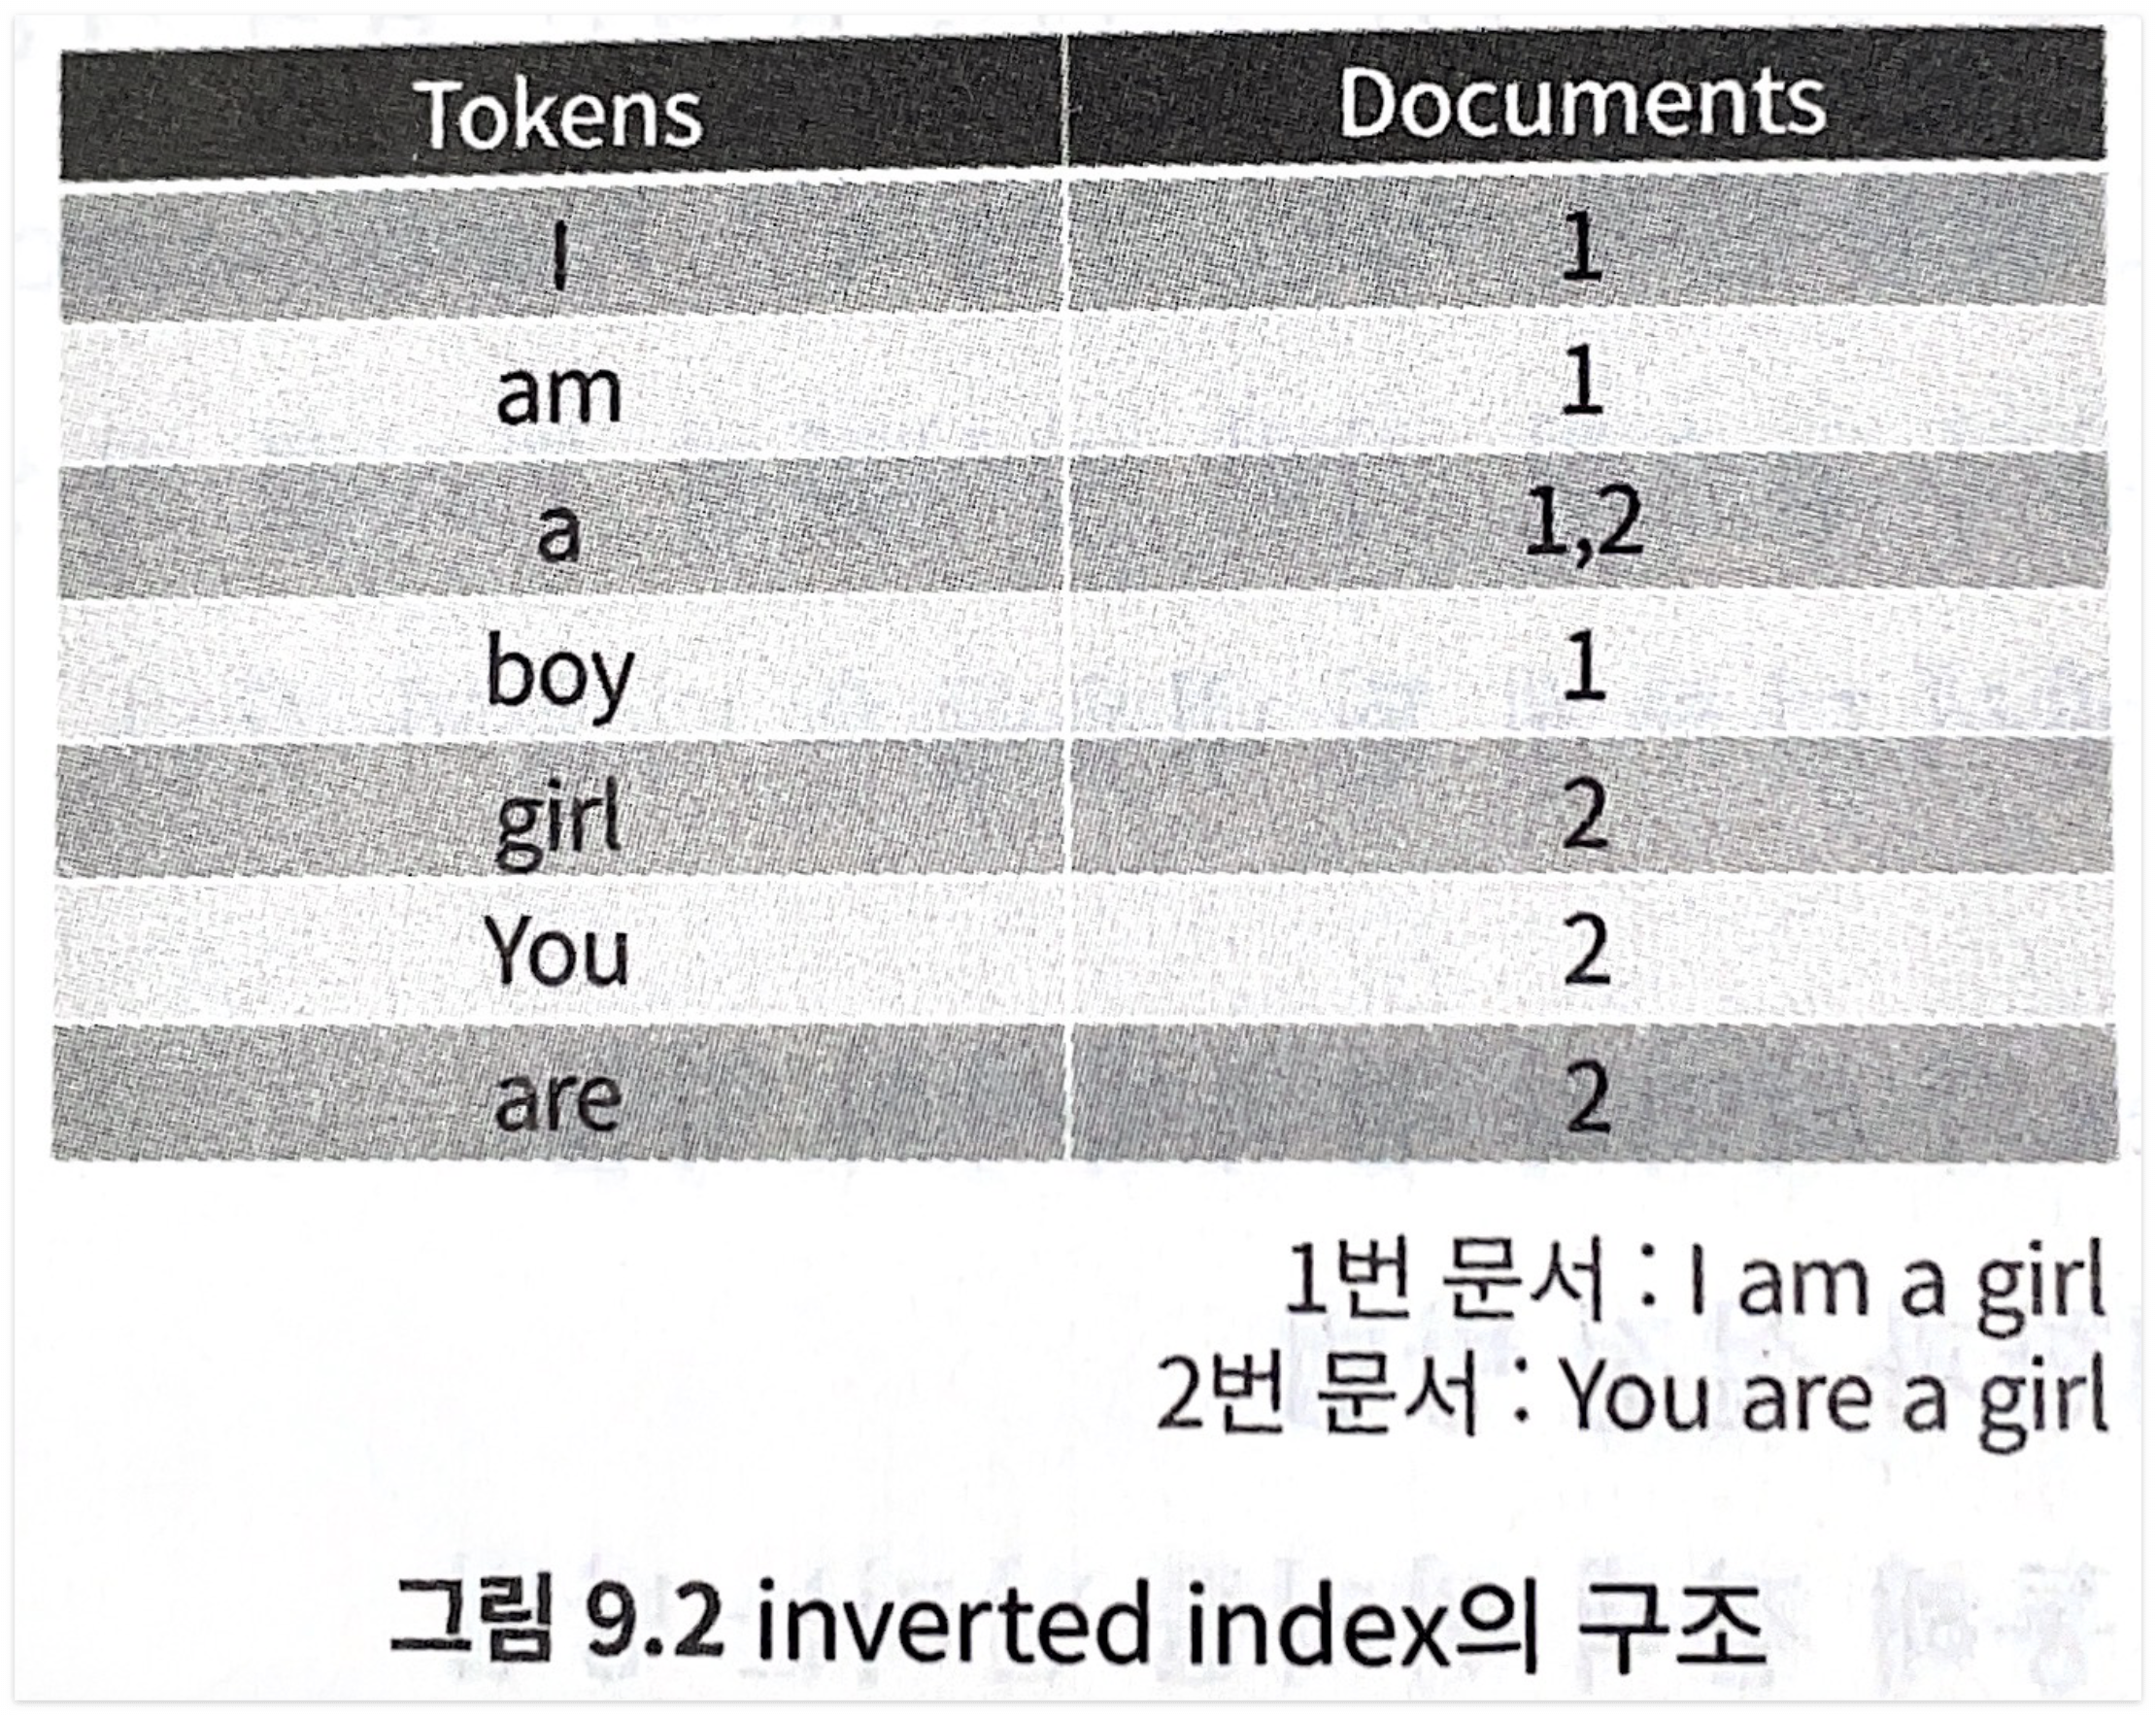
바로 엘라스틱 서치는 인덱스를 구성할 때 역 색인 구조로 문서를 저장하기 때문이다.
그렇다면 역색인이란 무엇인가?
RDB에서는 인덱스를 구성할 때 특정 컬럼을 기준으로 B-tree 구조로 별도의 인덱스 테이블을 만들고 몇 번째 로우에 어떤 데이터가 있다는 방식으로 저장을 하게 된다.
역 색인은 말 그대로 반전된 인덱스로써 어떤 데이터가 몇 번째 로우에 저장되어있는 지의 구조로 저장되는 것이다.
특히나 엘라스틱서치는 여러 단어들로 쪼개서 인덱스에 저장되기 때문에 키워드 검색 시에 뛰어난 속도를 나타낼 수 있는 것이다.
그렇다면 어떻게 inverted index에 문서들이 저장되는지 알아보자
I am a boy → I, am, a, boy
You are a girl → You, are, a, girl
위와 같이 데이터가 색인되기 전에 공백을 기준으로 단어를 나는데 이때 나눠진 단어들을 토큰이라고 부른다.
그리고 특정한 기준에 의해 토큰을 만들어내는 과정은 토크나이징이라고 한다.
이렇게 토크나이징 된 결과가 저장되는 형태를 inverted index라고 한다.

Q1. a boy라는 문자열로 검색을 해보자
1) 검색어 입력 시 공백 기준으로 a, boy가 토크나이징 된다.
2) a, boy 토큰로 inverted index를 검색한다.
3) a, boy 토큰은 1, 2번 문서에 존재한다는 것을 조회할 수 있다.
💡 참고로 검색 대상과, 검색 문자열의 토크나이징 하는 기준은 같아야 한다. 즉 검색 대상이 공백 기준으로 토크나이징 되었다면, 검색어 또한 공백으로 토크나이징 되어야 한다.
Q2. 검색어로 대문자 I가 아니라 소문자 i로 검색한다면? → 대소문자 상관없이 정확한 결과를 얻기 위해서는 어떻게 해야할까?
이는 ElasticSearch에서 제공하는 analyze API를 사용하면 된다.
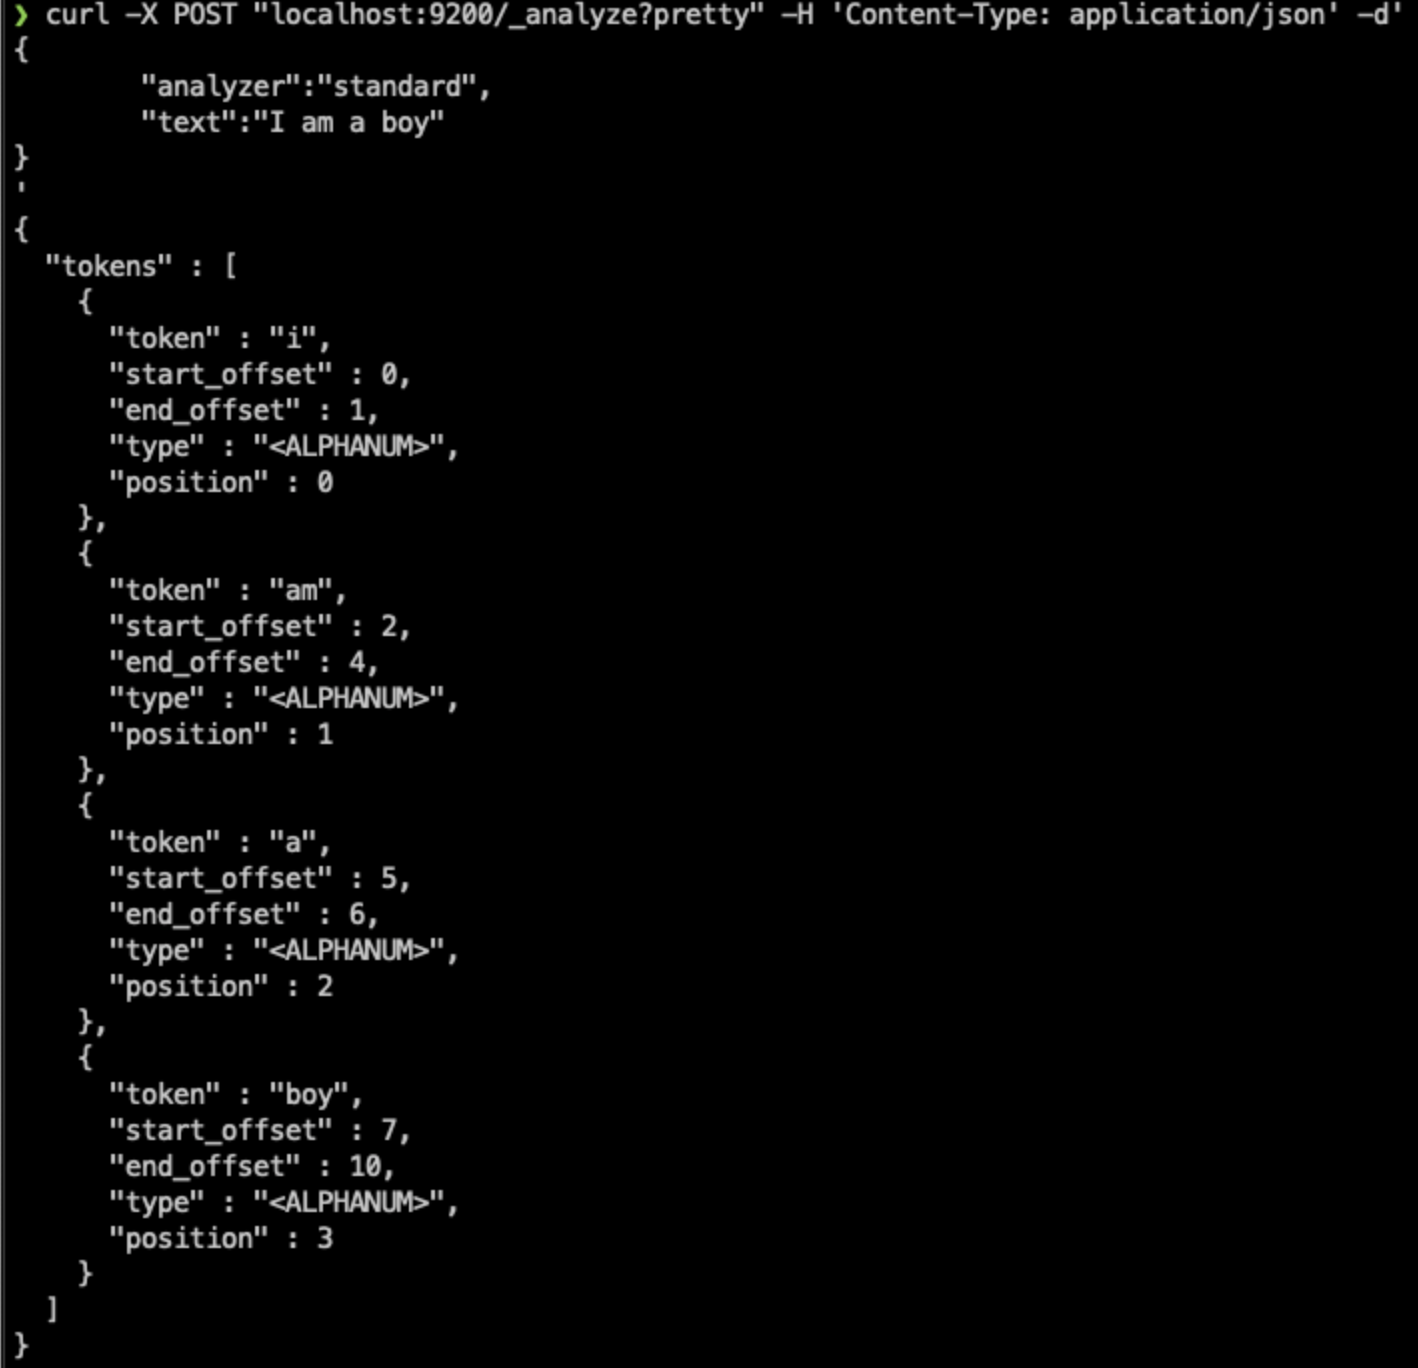
아래의 예제 코드는 가장 대표적인 analyzer 방식인 standard analyzer를 사용하여 토크나이징을 하는 예제이다.
standard analyzer를 사용하면 안에 내장된 토큰 필터를 사용하여 모든 대문자를 소문자로 치환하여 토크나이징 하게 된다.
analyzer에 대해 아래에서 자세히 알아보자.
curl -X POST "localhost:9200/_analyze?pretty" -H 'Content-Type: application/json' -d'
{
	"analyzer":"standard", // 토크나이징 방법
	"text":"I am a boy" // 토크나이징에 사용되는 문자열
}
'

analyzer
inverted index에 저장되는 데이터를 만드는 역할(토크나이징, 토큰 필터링 등..)을 하는 것을 analyze라고 한다.
analyzer의 구성
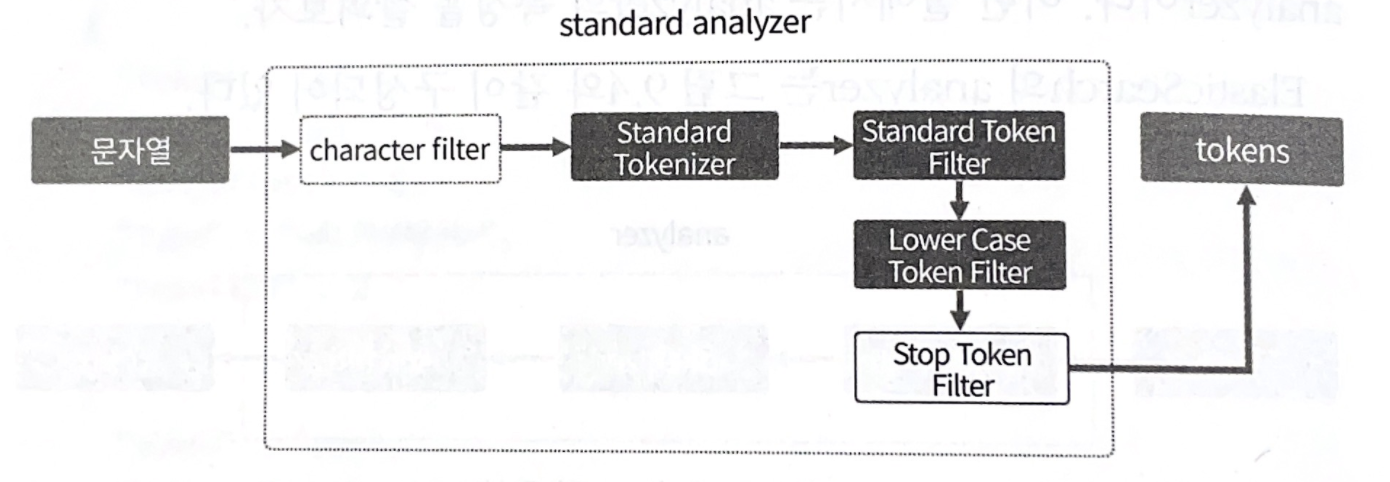
문자열 → character filter → tokenizer → token filter → tokens
character filter : analyzer 1차 관문
- 의미 없는 특수문자 제거
- HTML 태그 제거 등…
⇒ 문자열을 특정한 기준으로 가공 및 변경한다.
tokenizer : charater filter에서 변경된 문자열들이 특정 기준에 따라 n개의 토큰으로 나뉜다.
token filter : n개의 토큰들이 다시 한번 더 변형한다. ex) lowercase token filter 등
analyzer를 구성할 때는 tokenizer를 꼭 명시해주어야 한다. character, token filter는 기술 안 하거나 여러 개 기술할 수 있다.
standard tokenizer
대표적인 analyzer이며 한 개의 tokenizer와 3개의 token filter로 구성되어있다.

- standard token filter는 아무런 작업도 하지 않지만, 향후 개발 버전에서 필터링 기능을 사용하게 될 경우를 대비하여 포함되어있다.
- lower token filter : 입력된 토큰을 모두 소문자로 변형한다.
- stop token filter : stopwords로 지정된 토큰을 없애는 기능이다. 기본 설정은 비활성화로 설정되어있다.
먼저 standard tokenizer로 analyze를 해보자.
❯ curl -X POST "localhost:9200/_analyze?pretty" -H 'Content-Type: application/json' -d'
{
        "tokenizer":"standard",
        "text":"I am a boy"
}
'
{
  "tokens" : [
    {
      "token" : "I",
      "start_offset" : 0,
      "end_offset" : 1,
      "type" : "<ALPHANUM>",
      "position" : 0
    },
    {
      "token" : "am",
      "start_offset" : 2,
      "end_offset" : 4,
      "type" : "<ALPHANUM>",
      "position" : 1
    },
    {
      "token" : "a",
      "start_offset" : 5,
      "end_offset" : 6,
      "type" : "<ALPHANUM>",
      "position" : 2
    },
    {
      "token" : "boy",
      "start_offset" : 7,
      "end_offset" : 10,
      "type" : "<ALPHANUM>",
      "position" : 3
    }
  ]
}
⇒ token filter를 거치지 않았기 때문에 대문자 I로 저장되고 있는 것을 볼 수 있다.
standard analyzer로 분석해보자.
❯ curl -X POST "localhost:9200/_analyze?pretty" -H 'Content-Type: application/json' -d'
{
        "analyzer":"standard",
        "text":"I am a boy"
}
'
{
  "tokens" : [
    {
      "token" : "i",
      "start_offset" : 0,
      "end_offset" : 1,
      "type" : "<ALPHANUM>",
      "position" : 0
    },
    {
      "token" : "am",
      "start_offset" : 2,
      "end_offset" : 4,
      "type" : "<ALPHANUM>",
      "position" : 1
    },
    {
      "token" : "a",
      "start_offset" : 5,
      "end_offset" : 6,
      "type" : "<ALPHANUM>",
      "position" : 2
    },
    {
      "token" : "boy",
      "start_offset" : 7,
      "end_offset" : 10,
      "type" : "<ALPHANUM>",
      "position" : 3
    }
  ]
}
- 소문자 i로 바뀌어서 inverted index에 저장된 것을 볼 수 있다.
analyzer와 검색의 관계
검색을 할 때에는 inverted index에서 문서를 찾기 때문에 검색 니즈를 잘 파악해서 적합한 analyzer를 설정해야 한다.
또한 기존 인덱스에 설정한 analyzer를 바꾸고 싶을 때는 인덱스를 새로 만들어서 재 색인해야 하기 때문에 처음 인덱스를 생성할 때부터 신중하게 설정되어야 한다.
정확한 검색을 위한 analyzer의 중요도 테스트
아래와 같은 문서를 생성하였다.
curl -X POST "localhost:9200/docs/_doc/1?pretty" -H 'Content-Type:application/json' -d'
{
        "title" : "ElasticSearch Training Book",
        "content" : "ElasticSearch is coop open source search engine"
}'

{
  "_index" : "docs",
  "_type" : "_doc",
  "_id" : "1",
  "_version" : 1,
  "result" : "created",
  "_shards" : {
    "total" : 2,
    "successful" : 1,
    "failed" : 0
  },
  "_seq_no" : 0,
  "_primary_term" : 1
}
“ElasticSearch” 문자열로 title필드 검색해보자.
검색이 잘 되는 것을 볼 수 있다.
curl -X GET "localhost:9200/docs/_search?q=title:ElasticSearch&pretty"

{
  "took" : 905,
  "timed_out" : false,
  "_shards" : {
    "total" : 1,
    "successful" : 1,
    "skipped" : 0,
    "failed" : 0
  },
  "hits" : {
    "total" : {
      "value" : 1,
      "relation" : "eq"
    },
    "max_score" : 0.2876821,
    "hits" : [
      {
        "_index" : "docs",
        "_type" : "_doc",
        "_id" : "1",
        "_score" : 0.2876821,
        "_source" : {
          "title" : "ElasticSearch Training Book",
          "content" : "ElasticSearch is coop open source search engine"
        }
      }
    ]
  }
}
이번엔 똑같은 키워드로 content 필드에 검색해보았다.
❯ curl -X GET "localhost:9200/docs/_search?q=content:ElasticSearch&pretty"
{
  "took" : 2,
  "timed_out" : false,
  "_shards" : {
    "total" : 1,
    "successful" : 1,
    "skipped" : 0,
    "failed" : 0
  },
  "hits" : {
    "total" : {
      "value" : 0,
      "relation" : "eq"
    },
    "max_score" : null,
    "hits" : [ ]
  }
}
content를 대상으로는 데이터가 조회되지 않는다.
그 이유는 타입에 따라 달라지는 analyzer 때문이다. 기본적으로 text타입의 기본 analyzer는 standard analyzer이고, keyword 타입의 기본 analyzer는 keyword analyzer가 적용되어있다.
즉 각각의 필드가 토크나이징 하는 것이 다르기 때문에 검색이 안 되는 것이다.
standard analyzer와 keyword analyzer가 어떻게 다르게 토크나이징 되고 있는것인지 확인해보자.
다음은 title 필드에 저장된 문자열을 토크나이징 했을 경우이다.
공백을 기준으로 토크나이징이 된 것을 확인할 수 있다.
❯ curl -X POST "localhost:9200/_analyze?pretty" -H 'Content-Type: application/json' -d'
{
        "analyzer":"standard",
        "text":"ElasticSearch Training Book"
}
'

{
  "tokens" : [
    {
      "token" : "elasticsearch",
      "start_offset" : 0,
      "end_offset" : 13,
      "type" : "<ALPHANUM>",
      "position" : 0
    },
    {
      "token" : "training",
      "start_offset" : 14,
      "end_offset" : 22,
      "type" : "<ALPHANUM>",
      "position" : 1
    },
    {
      "token" : "book",
      "start_offset" : 23,
      "end_offset" : 27,
      "type" : "<ALPHANUM>",
      "position" : 2
    }
  ]
}
다음은 keyword analyzer로 토크나이징 했을 경우이다.
❯ curl -X POST "localhost:9200/_analyze?pretty" -H 'Content-Type: application/json' -d'
{
        "analyzer":"keyword",
        "text":"ElasticSearch is cool open source search engine"
}
'

{
  "tokens" : [
    {
      "token" : "ElasticSearch is cool open source search engine",
      "start_offset" : 0,
      "end_offset" : 47,
      "type" : "word",
      "position" : 0
    }
  ]
}
keyword analyzer를 사용하면 문장 전체가 통으로 토큰을 구성한다. 때문에 "elasticsearch" 문자열을 포함하고는 있지만 문장 전체가 통으로 토큰이 되어 inverted index에 저장되었기 때문에 검색이 안 되는 것이다.
어떤 analyzer를 사용하느냐에 따라 검색 결과와 품질이 달라지기 때문에 사용자의 검색 니즈를 잘 파악해서 적절한 analyzer를 사용해야 한다.
https://jiseok-woo.tistory.com/3
Elasticsearch가 빠르다는데..? inverted index?
앞서 언급했듯이 elasticsearch는 검색엔진이다. 검색엔진이면 당연히 저장되어 있는 데이터들 중 원하는 데이터를 찾아내는 속도가 빨라야 하겠지? 근데 그건 다른 DB들도 마찬가지다. 그렇다면 ela
jiseok-woo.tistory.com
'Dev > ElasticSearch' 카테고리의 다른 글
| [ElasticSearch] 엘라스틱 서치 (2) - 클러스터, 노드, 샤드 기본 개념 (0) | 2022.10.05 |
|---|---|
| [ElasticSearch] 엘라스틱 서치 (1) - 기본 개념 훑어보기 (0) | 2022.09.29 |


댓글